WASHING MACHINE
LAVE-LINGE / LAVADORA
Technical Information
Informations techniques / Información técnica
Models / Modèles / Modelos : WA40J3000A*
• Toavoidpropertydamage,personalinjury,and/ordeath,contactanauthorizedtechnicianforservicing
orrepairofthisunit.
• RefertotheServiceManualfordetailedinstallation,operating,testing,troubleshooting,and
disassemblyinstructions.
• And'éviterdesdommagesmatériels,desblessurescorporelleset/oumortelles,demandezàun
technicienqualiéd'eectuerlesopérationsd'entretienouderéparationdecetappareil.
• Reportez-vousaumanuelderéparationpourconnaîtrelesconsignesd'installation,d'utilisation,detest,
dedépannageetdedémontagedétaillées.
• Paraevitardañosmateriales,lesionesomuerte,comuníqueseconuntécnicoautorizadopararealizarel
mantenimientodeestaunidadopararepararla.
• ConsulteelManualdeservicioparaobtenerinstruccionesdetalladasdeinstalación,funcionamiento,
prueba,solucióndeproblemasydesensambledelaunidad.
CAUTION / ATTENTION / PRECAUCIÓN
FollowallsafetyinformationprovidedintheServiceManual.
Respecteztouteslesconsignesdesécuritégurantdanslemanuelderéparation.
SigatodalainformacióndeseguridadproporcionadaenelManualdeservicio.
WARNING / AVERTISSEMENT / ADVERTENCIA
Toavoidelectricalshock,personalinjuryand/ordeath,disconnectpowertothewasherbeforeservicing,
unlesstestingrequirespower.
And'éviteruneélectrocution,desblessurescorporelleset/oumortelles,débranchezlelave-lingeavant
deprocéderauxréparations(saufsiletestnécessitesamisesoustension).
Paraevitarriesgosdedescargaeléctrica,lesionesomuerte,antesderealizarelmantenimiento
desconectelaalimentacióndelalavadoraamenosquelapruebarequieraqueestéconectada.
DC68-03132K-01
TEST MODES
LineTestmodemustbeoperatedinnoloadstatus.
NO Mode How to enter
1 Line Test
2
Error Recall
Mode
TROUBLESHOOTING
Trouble diagnosis
Becausethemicomforawasherisacomplicatedstructure,aservicecallmayberequired.
Belowisinformationforexacttroublediagnosisandproperrepairguidelines.
Cautions for repair and replacement
Pleasefollowthebelowinstructionsfortroublediagnosisandpartsreplacement.
1. Becausesomeelectroniccomponentsaredamagedbythe
chargedstaticelectricityfromtheresinfromamachineorthe
humanbody,preparethehumanbodybygroundingittothe
earth,orremovethepotentialdierenceofthehumanbodyand
machinebycontactingthepowersupplyplugwhencontacting
thePCB.
2. BecauseAC120VisappliedtothetriacT1andT2onthePCB,
electricalshockmayoccurbycontacting.Takecautionthatthestrongandweakelectricityarenotmixed.
3. DonotreplacethePCBassemblyunlessit’sfounddefectivebyastrictdiagnosis.Followthetrouble
diagnosisprocedureifthemicomisnotoperatingnormally.
Does not start
• Plugthewasherintothewalloutlet.Checkforpropervoltage.
• Checkthefuseorresetthecircuitbreaker.
• ClosethedoorandpresstheStart/Pausebuttontostartthewasher.
• Checkifthewasherisinapause,soak,orsudsprocess.Waitbrieyanditmaystart.
(Ifthewasherisinasudsprocess,‘Suds’willlightupinsteadoftheremainingtime.)
• Checkforarestricteddrainsystem.(Ifthereisanelectricalproblemwiththedrainsystem,
“NODRAINING”errorwilloccurafter15minutes.)
• Checkthewatersupplyandtheline,orwatervalvescreenlter.
• CheckifthePCBconnectorsareconnectedtotheLCD/LEDmoduleproperly.
ReplacethePCBifanerrorisdetected.
Leaks
• Makesuretheinlethoseanddrainhoseconnectionsarenotleaking.
Checkforrubbergasketdamageduetoovertightening.
• Checkthestandpipesforleaks.Wrapadryragaroundthestandpipeopening.
Iftheragbecomeswet,theleakisduetohomeplumbing.
Makesurethestandpipeiscapableofacceptingthewaterowfromthewasher.
• Checkinternalhoseconnections(ll,drainsystems,dispenserhoses,andclamps).
• Checktherubberboot.Remove,reposition,andreinstallifnecessary.
• Checkforkinksinthedispenserhosetotheoutertub.Hotwaterpressurizationmayforcethedooropen.
Does not tumble
• Startanempty,normalcycleandallowittolltocheckifthewashertumbles.
• PerformaQuickSpinTest.Beforetesting,makesurethetumblerisempty.
• Checkforlooseconnectionsatthemachinecontrolboard,pressureswitch,motor,tachharness,and
motorcontrol.(Refertothecomponenttestingprocedures.)
• Checkmotorwindingsresistance.CN8Pin3&CN7Pin1/CN8Pin3&CN7Pin2=11.6ohms(at±7%
20ºC).
Does not spin
• Makesurethedooriscompletelyclosed.
• Checkforremainingwaterinthewasher.Ifthereisremainingwater,see“Does not drain”.
• PerformQuickSpinTest.(Makesurethewasherisempty.)Ifitdoesnottumbleafterperformingthetest,
replacethePCB.Iftheproblempersists,replacethemotor.
• Ifthewasherspins,checkforapossibleunbalancedloadscenarioinnormalmode.
• CheckforlooseconnectionsatthePCB,waterlevelsensor,motor,andhallsensorwireharness.
(CN7,CN10)Refertothecomponenttestingprocedures.
•
Checkmotorwindingsresistance.CN8Pin3&CN7Pin1/CN8Pin3&CN7Pin2=11.6ohms(at
±7%20ºC).
Water does not fill
• PerformQuickTestMode.Visuallycheckallthewatervalves.(Cold/HotWaterValve)
• Makesuretapsarefullyopen.Checkwaterleversensor.(RefertothePCBConnectorCheck.)
• Checkifthereareanykinksintheinlethosesandifinletscreensareclogged.
• Checkifthereisenoughwaterpressureandanyfrozenareaintheunit(drainhose,etc.).
• Measuretheresistanceofthewatervalvecoil.CN8Pin3&CN1Pin1,2,3=1.18Kohms.
• CheckpressureS/WandPCBforlooseconnections.(RefertothePCBConnectorCheck.)
Wet clothes
• Unbalancedload.Addmoreclothingtotheload.
• Duetoexcessivesudsbyusinggeneraldetergent.UseHE(High-Eciency)detergentorreducethe
amountofdetergentused.
• LowSpinspeedorDrainOnlywasselected.See,“Does not spin”.
Drum full of suds
• See,“Does not drain”and“Does not spin”andcheckthedraining.
• CheckthePCBanddrainpumpforanyloosewireconnections.
• PerformQuickTestModeoraBoardOutputTesttodrain.
• UseHE(High-Eciency)orlowsudsdetergentspeciallyformulatedforfrontloadwashers.
• Reducetheamountofdetergentforthatspecicloadsizeandsoillevel.Towelsgenerallycreatemore
suds.Doawashcyclewithcoldwaterandatablespoonofsaltwithoutdetergent.
Door does not lock
• Doorisnotalignedorclosedproperly.
• PerformQuickTestMode.Checktheoutputvoltageofthedoorlockcoil.Ifitreads120V,replacethe
doorlockswitch;ifnot,replacethePCB.(RefertothePCBConnectorCheck.)
Door does not unlock
• Checkifthedoorisdeformed.Thismaypreventthedoorfromunlocking.
• Doorlocksitselfwhenthewaterlevelistoohigh.Openingthedoorwillresultinwaterdraining.
• CheckthefollowingwithBoardInputTestMode:
Waterlevel(frequency):Over23.80KHz.➞Ifso,refertoDoes not drain.
Temperature(insidedrum):Higherthan60°C/140°F.➞Ifso,waituntilitdrops.
Wheneverythingisnormal,checkthePCBconnectorsanddoorlockswitch.
• Thedisplayshows“The door will not unlock”.Turnothewasherandthenturniton.If“The door will
not unlock”stillappears,checkthePCBanddoorlockswitch.
• PerformQuickTestMode.Checkdoorlock.Checktheoutputvoltageofthedoorlockcoil.Ifitreads
120V,replacethedoorlockswitch;ifnot,replacethePCB.
Buttons do not work
• TheOptionandFunctionbuttonsresponddierentlyaccordingtoeachcycle.
• ChildLockisactivated.Todisable,simultaneouslyholddowntheSpinandSoil Level
buttonsuntilthewasherbeeps.
• When“End”appearsonthedisplay,onlythePowerbuttonworks.PressthePowerbutton
andmakenewcycleselections.
Does not drain
• Checkforkinksorrestrictions(frozen,etc)onthedrainhose.
• ClosethedoorandpresstheStart/Pausebutton.
Forsafetyreasons,thewasherdoesnottumbleorspinwiththedooropen.
• Checkifthewaterlevelsignalinputiscorrect.GotoBoardInputTestMode.
• GotoQuickTestModeandperformaDrainPumpTest.
• CheckifitreadsAC120V(resistance=14.2±7%ohms)atthepumpwhenaspincycleisselected.
• CheckthepumpatCN1(PIN6)onthePCB.ItshouldreadAC110~120V.
Incorrect water temperature
• Checkifbothofthewatertapsarefullyopenandthetemperatureselectioniscorrect.
• Makesurethedomesticwaterheaterissettosupplyhotwaterlowerthan120°F(49°C).Checkthe
waterheatercapacityandrecoveryrate.
• Ifthewaterheaterislocatedfarfromthewasher,screwoutthehotwatertapandletthewaterowuntil
yougethotwater.
• Toohot/toocold:AreducedamountofwaterissuppliedwhilethePCBcontrolstheinuxtoregulatethe
actualtemperatureofthewaterinthetub.Thismayseemtobesignicantlyhotter/colderthanexpected.
• Disconnecttheinlethosesfromthewatervalveandremoveanyresiduefromtheinletscreens.
Noisy and/or vibrates
• Checkifthewasherislevelandthelocknutsaretightenedonthebottomplate.
• Makesuretheloadisofadequatesizeandisnotunbalanced.
• Checkifthemotorisfastenedenough.
• Removethingsthatcouldcontributetonoises/vibrations.
(suchasshippingbolt,spacersandobjectsleaningonthewasher)
Diagnosis
- Connectpowertothediagnosticdevice.Alastusedcodeappearsonthedisplay.
Ifnocodeappears,checkthefollowingasinstructed.
CODES D’INFORMATION
N°
Code
d’information
Signification Action
1
La DEL Hot
(Chaud) clignote
Lecouvercleestouvertlorsdu
fonctionnementdulave-linge.
ConsultezlasectionDépannage«Lelave-linge
nedémarrepas».
2
La DEL Warm
(Tiède) clignote
Erreurdecommunicationentre
lacartedecircuitimprimé
secondaireetlacartedecircuit
impriméprincipale.
ConsultezlasectionDépannage«Lelave-linge
nedémarrepas».
3
La DEL Cold
(Froid) clignotee
Leboutonnefonctionnepas
correctement.
ConsultezlasectionDépannage«Lesboutons
nerépondentpas».
4
La DEL Tap Cold
(Robinet d'eau
froide) clignote
Lecapteurdeniveaud'eaune
fonctionnepascorrectement.
ConsultezlasectionDépannage«Vérication
ducapteurd'eau».
5
La DEL Extra
Large (Très
grande) clignote
1.Impossiblederemplirle
lave-linge.
2.Vériezqueletuyaud'arrivée
d'eauchaudeestconnecté.
ConsultezlasectionDépannage«Lacuvene
seremplitpas».
6
La DEL Large
(Grande) clignote
Leremplissagedulave-lingen'est
passusant.
ConsultezlasectionDépannage«Fuites».
7
La DEL Medium
(Moyenne)
clignote
Uneerreuraétédétectéesurle
capteurdeniveaud'eau.
ConsultezlasectionDépannage«Vérication
ducapteurd'eau».
8
La DEL Small
(Petit) clignote
Votrelave-lingenevidangepas.
Celapeutégalementsignierque
l'appareiladétectéunepetite
obstructionlorsdelavidange.
ConsultezlasectionDépannage«Lelave-
lingenesevidangepas&Tambourremplide
mousse».
9
Les DEL Hot &
Warm (Chaud et
Tiède) clignote
Unechargenon-équilibrée
empêchel'essorage.
ConsultezlasectionDépannage«Bruitet/
ouvibrations&L'essoragen'apasfonctionné
(vêtementsmouillés)».
10
Les DEL Hot &
Cold (Chaud et
Froid) clignote
Lemoteurnefonctionnepas
correctement.
ConsultezlasectionDépannage«Vérication
del'alimentationCA&Véricationducapteurà
eetTMR».
11
Les DEL Hot &
Tap Cold (Chaud
et Robinet d'eau
froide) clignote
Lecapteurmemsnefonctionne
pascorrectement.
ConsultezlasectionDépannage«Lelave-linge
nedémarrepas».
12
Les DEL Hot
& Extra Large
(Chaud et Très
grande) clignote
Leverrouillagedelaportene
fonctionnepascorrectement.
ConsultezlasectionDépannage«Lehublotne
severrouillepas&Lehublotnesedéverrouille
pas».
13
Les DEL Hot &
Large (Chaud et
Grande) clignote
Leverrouillagedelaportene
fonctionnepascorrectement.
ConsultezlasectionDépannage«Lehublotne
severrouillepas&Lehublotnesedéverrouille
pas».
14
Les DEL Hot &
Medium (Chaud et
Moyenne) clignote
Lathermistancenefonctionne
pascorrectement.
ConsultezlasectionDépannage«
Températuredel’eauincorrecte&Vérication
delathermistance».
15
Les DEL Hot &
Small (Chaud et
Petit) clignote
Latempératuredel'eaufournie
esttropélevée.
S'assurerquelerobinetd'eaufroideetlerobinet
d'eauchaudesoitcorrectementraccordés.Sile
coderéapparaît.
ConsultezlasectionDépannage«Températurede
l’eauincorrecte».
MODES DE TEST
Lemodedetestdelignenedoitêtreutiliséquelorsquelestatutestsanscharge.
N° Mode Pour sélectionner ce mode
1 Test de ligne
2
Mode rappel
d'erreur
DÉPANNAGE
Diagnostic du problème
Lemicomdulave-lingeétantunestructurecomplexe,ilpeuts'avérernécessaired'appelerleservice
d'assistance.Lesinformationssuivantessontdestinéesàétablirundiagnosticprécisd'unproblèmeet
constituentdesinstructionsderéparationadaptées.
Précautions concernant la réparation et le remplacement
Respectezlesconsignesci-dessouspourlediagnosticdesproblèmesetleremplacementdespièces.
1. Certainscomposantsélectroniquesrisquantd'êtreendommagés
parl'électricitéstatiquerecouvrantlapartieenrésinedelamachine
oulecorpshumain,veillezàcequevotrecorpssoittoujoursreliéà
laterreouéliminezladiérencedepotentielentrevotrecorpsetle
lave-lingeentouchantlaprised'alimentationavantdetravaillersurla
cartedecircuitimprimé.
2. Unetensionde120VCAétantappliquéeauxtriacsT1etT2dela
cartedecircuitimprimé,vousrisquezdevousélectrocutersivoustouchezceséléments.Veillezégalementque
lescourantsfortsetfaiblesnesoientpasmélangés.
3. Neremplacezpaslacartedecircuitimprimésiellen'estpasidentiéecommeétantdéfectueuseparun
diagnosticstrict.Respectezlaprocéduredediagnosticdesproblèmessilemicomnefonctionnepas
correctement.
Le lave-linge ne démarre pas
• Branchezl'appareilsurlaprisemurale.Vériezquelatensionestadaptée.
• Vériezlesfusiblesouréarmezledisjoncteur.
• FermezlehublotetappuyezsurleboutonStart/Pause (Départ/Pause)pourdémarrerlelave-linge.
• Vériezquelelave-lingen'estpasdansunephasedepause,detrempageoudelessivage.Ilsepeutquela
machineseremetteenmarcheaprèsquelquesminutes.
(Silelave-lingesetrouvedansunephasedelessivage,lemessage«Suds»(Mousse)s'acheaulieudu
tempsrestant.)
• Vériezquelesystèmedevidangen'estpasobstrué.(Encasdeproblèmeélectriquedanslesystèmede
vidange,lemessage« NODRAINING »(PASDEVIDANGE)s'acheaprès15minutes.)
• Vériezl'arrivéed'eauetletuyauouletamisdultredelavanned'arrivéed'eau.
• VériezquelesconnecteursdelacartedecircuitimprimésontcorrectementconnectésaumoduleLCD/DEL.
Remplacezlacartedecircuitimprimésiuneerreurestdétectée.
Fuites
• Assurez-vousquelesraccordementsdestuyauxd'arrivéed'eauetdestuyauxdevidangenefuientpas.
Vériezquelejointencaoutchoucn'apasétéendommagélorsduserrage.
• Vériezl'absencedefuitesauniveaudesconduitesd'évacuation.Enroulezunchionsecautourdel'ouverture
delaconduited'évacuation.
Silechiondevienthumide,lafuiteprovientdelaplomberiedel'habitation.
Assurez-vousquelaconduited'évacuationpeutrecevoirleuxd'eauprovenantdulave-linge.
• Vériezlesraccordementsdestuyauxinternes(remplissage,systèmesd'évacuation,tuyauxdedistributionet
colliersdeserrage).
• Vériezl'étatdelamanchetteencaoutchouc.Sinécessaire,retirez-la,repositionnez-laetréinstallez-la.
• Vériezqueletuyaudedistributionsurlacuveextérieuren'estpasemmêlé.Lamisesouspressiondel'eau
chaudepeutforcerl'ouvertureduhublot.
Le tambour ne tourne pas
• Lancezuncyclenormalàvideetlaissezsedérouleruncyclederemplissagepourvérierlarotationdutambour
dulave-linge.
• EectuezunTestdel'essoragerapide.Avantletest,assurez-vousqueletambourestvide.
• Vériezlesconnexionsauniveaudupanneaudecommandedelamachine,dupressostat,dumoteur,du
faisceauélectriquedutachymètreetdelacommandedumoteur.(Reportez-vousauxprocéduresdetestdes
composants.)
• Vériezlarésistancedesbobinesdumoteur.
CN8Pin3&CN7Pin1/CN8Pin3&CN7Pin2=11.6ohms(at±7%20ºC)
Le lave-linge n'essore pas
• Vériezquelehublotestbienfermé.
• Vériezlaquantitéd'eaurestantedanslelave-linge.S'ilrestedel'eau,reportez-vousà« Le lave-linge ne se
vidange pas ».
• Eectuezuntestdel'essoragerapide.(Assurez-vousquelelave-lingeestvide.)Encasd'absencederotation
dutambouraprèsavoireectuéletest,remplacezlacartedecircuitimprimé.Sileproblèmepersiste,remplacez
lemoteur.
• Silelave-lingeprocèdeàl'essorage,vériezs'ils'agitd'unproblèmededéséquilibredelachargeenmode
normal.
• Vériezleséventuellesconnexionsdesserréesauniveaudufaisceauélectriquedelacartedecircuitimprimé,du
capteurdeniveaud'eau,dumoteuretducapteuràeetHall.(CN7,CN10)Reportez-vousauxprocéduresde
testdescomposants.
• Vériezlarésistancedesbobinesdumoteur.
CN8Pin3&CN7Pin1/CN8Pin3&CN7Pin2=11.6ohms(at±7%20ºC).
La cuve ne se remplit pas.
• LancezleModedetestrapide.Procédezàuncontrôlevisueldel'étatdetouteslesvannesd'arrivéed'eau.
(Vanned'eaufroide/chaude.)
• Assurez-vousquelesrobinetsd'eausontentièrementouverts.Vériezlecapteurdeniveaud'eau.
(Reportez-vousàlapartieContrôledesconnecteursdelacartedecircuitimprimé.)
• Vériezqu'aucuntuyaud'arrivéed'eaun'estemmêléetquelestamisd'arrivéed'eaunesontpasobstrués.
• Vériezs'ilyaassezdepressiond'eauetqu'aucunélémentdel'appareiln'estgelé(tuyaudevidange,etc.).
• Mesurezlarésistancedelabobinedelavanned'arrivéed'eau.
CN8Pin3&CN1Pin1,2,3=1.18Kohms.
• Vériezlesconnexionsauniveauducommutateurdepressionetdelacartedecircuitimprimé.
(Reportez-vousàlapartieContrôledesconnecteursdelacartedecircuitimprimé.)
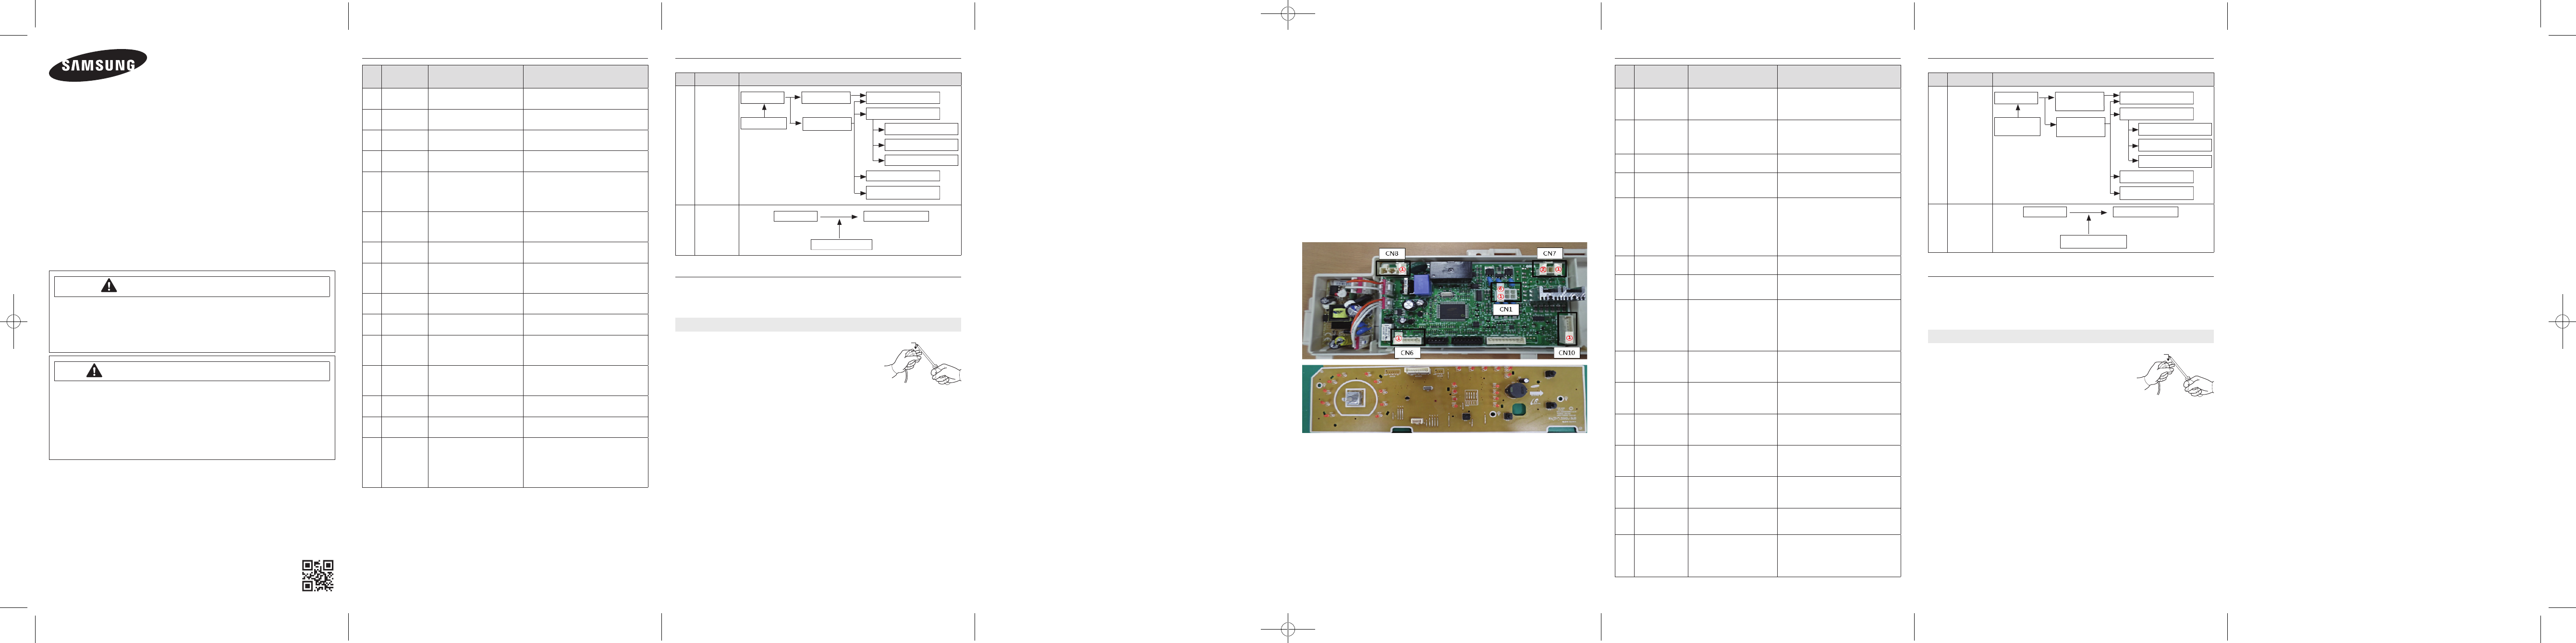
Thermistor Check
CheckResistanceatPin#3and#9ofCN10
TesterCheck=47㏀
TMR Sensor Check
CheckVoltageatPin#8andPin#1ofCN10
Whenspinmode=5VDC
CheckvoltageatPin#5andPin#1ofCN10
WhenspinmodeandExtraLargelamplightingup=
about2.9VDC
Motor Check
CheckVoltageatPin#1ofCN7andPin#3ofCN8
CheckVoltageatPin#2ofCN7andPin#3ofCN8
WhenWashmodeMotoroperates=AC120V
CheckVoltageatPin#1ofCN7andPin#3ofCN8
WhenSpinmodemotoroperates=AC120V
Pump Check
CheckVoltageatPin#6ofCN1andPin#3ofCN8
WhenDrainPumpoperates=AC120V
Water Sensor Check
CheckFrequencyatPin#6and#9ofCN10
Resetfrequency=25.6KHz
CheckResistanceatPin#7and#9ofCN10
Resetfrequency=25.6KHz
Water Valves Check
CheckVoltageatPin#1,2,3ofCN1andPin#3ofCN8
WhenValvesoperates=AC120V
Clutch-Motor Check
CheckVoltageatPin#4ofCN1andPin#3ofCN8
WhenMotoroperates=AC120V
AC Power Check
CheckVoltageatPin#1&3ofCN8
TesterCheck=AC120V
INFORMATION CODES
NO
Information
code
Meaning Action
1
Hot LED
Flashes
Lidisopenwhenwasheris
running.
Goto“Doesnotstart”Troubleshooting
Section.
2
Warm LED
Flashes
Communicationcodebetween
SUBPBAandMAINPBA.
Goto“Doesnotstart”Troubleshooting
Section.
3
Cold LED
Flashes
Buttonisnotworkingproperly.
Goto“Buttonsdonotwork”Troubleshooting
Section.
4
Tap Cold LED
Flashes
TheWaterLevelsensorisnot
workingproperly.
Goto“WaterSensorCheck”Troubleshooting
Section.
5
Extra Large
LED Flashes
1.YourWasherhastriedtollbut
wasunsuccessful.
2.Checkifthehotwatersupply
hoseisconnected.
Goto“Waterdoesnotll”Troubleshooting
Section.
6
Large LED
Flashes
YourWasherhastriedtollbut
hasnotreachedtheproperwater
level.
Goto“Leaks”TroubleshootingSection.
7
Medium LED
Flashes
Afaultisdetectedinthewater
levelsensor.
Goto“WaterSensorCheck”Troubleshooting
Section.
8
Small LED
Flashes
Yourwasherisnotdraining.Itcan
alsomeanthattheunitsensesa
smallclogwhiledraining.
Goto“Doesnotdrain&Drumfullofsuds”
TroubleshootingSection.
9
Hot & Warm
LEDs flash
Unbalancedloadpreventedyour
Washerfromspinning.
Goto“Noisyand/orvibrates&Wetclothes”
TroubleshootingSection.
10
Hot & Cold
LEDs flash
Motornotrunningproperly.
Goto“ACPowerCheck&TMRSensor
Check”TroubleshootingSection.
11
Hot & Tap
Cold LEDs
flash
Memssensorisnotworking
properly.
Goto“Doesnotstart”Troubleshooting
Section.
12
Hot & Extra
Large LEDs
flash
Doorlockisnotworkingproperly.
Goto“Doordoesnotlock&Doordoesnot
unlock”TroubleshootingSection.
13
Hot & Large
LEDs flash
Doorlockisnotworkingproperly.
Goto“Doordoesnotlock&Doordoesnot
unlock”TroubleshootingSection.
14
Hot & Medium
LEDs flash
Thermistorisnotworkingproperly.
Goto“Incorrectwatertemperature&
ThermistorCheck”TroubleshootingSection.
15
Hot & Small
LEDs flash
Thetemperatureofthesupplied
waterissohigh.
Ensurethatthecoldwatertapandthehot
watertapareconnectedcorrectly.Ifthecode
reappears.
Goto“Incorrectwatertemperature”
TroubleshootingSection.
Error Recall Mode
- Check the last error
Hold down Temp Key for 3sec
Mode rappel d'erreur - Vérifie la dernière erreur
Maintenez la touche température
basse pendant 3 secondes
Temp + Démarrage: Verrouillage/
déverrouillage du hublot
Programme Waterproof (Étanche à
l'eau): Test d'essorage
Programme Delicates (Délicat): Test
moteur On/O
Load Size (Taille de la charge) +
Démarrage: Test de la pompe
Vérifie le mode exécution
utilisant la molette de
sélection.
Programme Normal : Version MCU SW
Programme Heavy Duty (Grand
rendement): Option du modèle
Temp : Test de la vanne d'arrivée d'eau
Toutes les LED
s'allument pendant 30
secondes
Mode de test de ligne
Load Size (Taille de
la charge) + Power
(Marche/Arrêt)
Temp + Start : Door Lock/Unlock
Waterproof course : Spin test
Delicates course : Motor On/O Test
Load Size + Start : Pump Test
Check the run mode
using Jog Dial
Normal Course : MCU SW version
Heavy Duty Course : Model Option
Temp : Water Valve Test
All LEDs On for 30 sec Line Test Mode
Load Size + Power Key
Français canadien Français canadien Français canadienEnglish English English English
POWER SUPPLY PLUG
PRISE D'ALIMENTATION
WA3000J_WA40J3000AW_DC68-03132K-01(AA).indd 1-8 2015/6/3 15:51:38


 (114 pages)
 (21 pages)
 (12 pages)

 (16 pages)
 (136 pages)
 (2 pages)
 (2 pages)
 Manymanuals.com
 Manymanuals.de
 Manymanuals.fr
 Manymanuals.it
 Manymanuals.pl
 Manymanuals.cz
 Manymanuals.es
 Manymanuals-pt.com
Comments to this Manuals